I have very little practical experience with MVVM and WPF, so I thought it would be incredibly useful for me to post some misinformation on the subject. Please feel free to correct any (or all) of my mistakes in the comments or via email, and I’ll update the post accordingly.
At work a few of us went through a very simple practice exercise to try and get the basics of the pattern. The goal was to create a screen that accepts two numbers and displays their sum, but do it using MVVM as if it were a real problem rather than a trivial one.
MVVM, or Model - View - ViewModel (a.k.a. Presentation Model), is a separated presentation pattern for use with frameworks like WPF that have good support for data-binding and other view interations. This differs from Model View Presenter (MVP) in that MVP tends to be more prescriptive, the presenter explicitly controlling everything the view does (at least in the Passive View incarnation of the pattern). This tends to result in a lot of plumbing code (these items should go in this list on the view, when a new item is selected the view should display a new list of items, etc.).
MVVM relies on databinding, commands etc. in the framework to remove some of this plumbing code, leaving us to focus on the logical model of our view (or the ViewModel), and our application/domain logic (the Model). The View is then just the physical representation of our logical ViewModel, containing no logic other than how to physically represent the logical view.
For this example we’ll design a view for our adder screen, test drive a ViewModel representation of the screen, then wire them together using WPF databinding.
Designing our view
For our very useful Adder screen we’ll need two text boxes so the user can enter the numbers to add, and a label that will display the result of the addition. Whenever one of the numbers is changed our result will need to be updated to reflect the number total. When we are done it might look a bit like this:
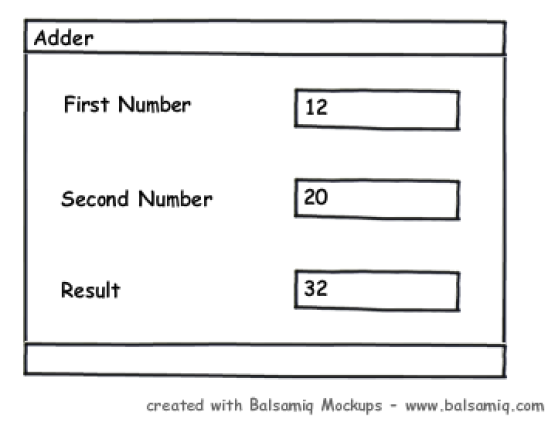
Because we are separating the physical from logical representation of the view, we will fairly easily be able to change how this looks, but in terms of how our screen will logically function, this contains all the details we need.
Test driving the ViewModel
Our view design requires input for two numbers. Whenever those numbers change our result will change. We’ll write a test for that, and make it pass:
public class AdderViewModelTests {
    [TestFixture]
    public class When_both_numbers_are_provided {
        private Adder _adder;
        private AdderViewModel _adderViewModel;
        private int _expectedResult;

        [SetUp]
        public void SetUp() {
            const int firstNumber = 10;
            const int secondNumber = 123;
            _expectedResult = 4545;

            _adder = MockRepository.GenerateStub<Adder>();
            _adder.Stub(x => x.Add(firstNumber, secondNumber)).Return(_expectedResult);
            _adderViewModel = new AdderViewModel(_adder);

            _adderViewModel.FirstNumber = firstNumber;
            _adderViewModel.SecondNumber = secondNumber;
        }

        [Test]
        public void Should_set_result_from_adder() {
            Assert.That(_adderViewModel.Result, Is.EqualTo(_expectedResult));
        }
    }
}

public class AdderViewModel {
    private readonly Adder _adder;
    public AdderViewModel(Adder adder) { _adder = adder; }
    public int FirstNumber { get; set; }
    public int SecondNumber { get; set; }
    public int Result { get { return _adder.Add(FirstNumber, SecondNumber); } }
}
This test is specifying that our AdderViewModel will use an Adder, and the result of the call to _adder.Add(firstNumber, secondNumber) will be used to set the Result in the view model.
Now, logically, the element displaying our result will need to know when a new result is calculated so it can update. One way to do this in WPF is to make our ViewModel implement INotifyPropertyChanged and use a property changed event whenever the result changes . Let’s add a test for that (there are better ways of doing this, but this will do for now):
[SetUp]
public void SetUp() {
    const int firstNumber = 10;
    const int secondNumber = 123;
    _expectedResult = 4545;

    _adder = MockRepository.GenerateStub();
    _adder.Stub(x => x.Add(firstNumber, secondNumber)).Return(_expectedResult);
    _adderViewModel = new AdderViewModel(_adder);
    RecordPropertyChangeOnViewModel();

    _adderViewModel.FirstNumber = firstNumber;
    _adderViewModel.SecondNumber = secondNumber;
}

private void RecordPropertyChangeOnViewModel() {
    _adderViewModel.PropertyChanged += (sender, args) => _propertyChanged = args.PropertyName;
}

[Test]
public void Should_indicate_that_result_has_changed() {
    Assert.That(_propertyChanged, Is.EqualTo("Result"), "Should have raised property changed event for Result property");
}

[Test]
public void Should_set_result_from_adder() {
/* ... snip ... */
One thing I want to make absolutely, 100% clear here: our tests are not driving this design decision. We are doing this whole INotifyPropertyChanged thing because we know it is one of the ways to get our WPF view to update the displayed result. This is something that has tended to annoy me greatly when reading TDD UI examples, these patterns seem to pop out from nowhere and I can never see the link between the tests and the design. In this case there isn’t any. I’ll save my rant for another day, but just be aware that while tests can drive design, you still need to be aware of the basic direction you are heading: the fundamental algorithm you are building, and the UI framework you’ll be interacting with. When I did this exercise I didn’t even have the changed event tested. But it is an easy enough test to write, and is essential for our binding to work, so we may as well include it (before the code, after the code, it’s all good!).
We start by making AdderViewModel implement INotifyPropertyChanged, then add the PropertyChanged event. We’ll then want to fire this event whenever the Result changes. As the result changes as the numbers do, we can do this from the setters of our FirstNumber and SecondNumber properties. While we could just raise the property changed event directly from these setters, I think it makes more sense to raise this when the Result itself changes. To me it is a bit more intention-revealing that way (in other situations where we had delayed execution or an out-of-proc service call then it would also make more sense to update when the value is set rather than when a dependency changes).
Update 2010-05-02: There is a problem with this approach! The ViewModel is meant to be a logical representation of the physical view. In the implementation below, if we set the FirstNumber or SecondNumber properties via code then there will not be PropertyChanged events raised specifically for those properties. As a result, the data-binding on our view will not be notified of the update and the text boxes will still show the old numbers. Not a good representation of our view!
In this case we’re only setting these properties from the view, so we won’t see the problem, but the fact our ViewModel does not adequately represent the view could cause problems later. To fix it we can raise PropertyChanged when any data-bindable properties are changed (not just when Result changes). We can cover this with tests just as we did for when Result changes.
Thanks a lot to Hüseyin Tüfekçilerli for pointing this out in the comments.
public class AdderViewModel : INotifyPropertyChanged {
    private readonly Adder _adder;
    private int _firstNumber;
    private int _secondNumber;
    private int _result;

    public AdderViewModel(Adder adder) {
        _adder = adder;
    }

    public int FirstNumber {
        get { return _firstNumber; }
        set { _firstNumber = value; NumberChanged(); }
    }

    public int SecondNumber {
        get { return _secondNumber; }
        set { _secondNumber = value; NumberChanged(); }
    }

    private void NumberChanged() {
        Result = _adder.Add(_firstNumber, _secondNumber);
    }

    public int Result {
        get { return _result; }
        set { _result = value; OnResultChanged(); }
    }

    public event PropertyChangedEventHandler PropertyChanged;

    private void OnResultChanged() {
        var handler = PropertyChanged;
        if (handler == null) return;
        handler(this, new PropertyChangedEventArgs("Result"));
    }
}
Test’s pass, so let’s hit the XAML.
Implementing a physical view over our view model
When I created my project for this exercise I used the basic WPF Application template, which creates an App.xaml and MainWindow.xaml. Let’s just get an ugly MainWindow working first.
<Window x:Class="WpfCalculatorKata.MainWindow"
        xmlns="http://schemas.microsoft.com/winfx/2006/xaml/presentation"
        xmlns:x="http://schemas.microsoft.com/winfx/2006/xaml"
        Title="Adder" Width="200" Height="200">
    <StackPanel>
        <TextBox Name="firstNumber" Text="{Binding FirstNumber}" />
        <TextBox Name="secondNumber" Text="{Binding SecondNumber}" />
        <Label Name="result" Content="{Binding Result}" />
    </StackPanel>
</Window>
Here we’re just shoving two textboxes and one label into a stack panel, and attempting to bind each control to the relevant property on the view model.
A word or two on XAML
We now interrupt this example to provide a 5 second overview of XAML. The easiest way I’ve found to think of XAML is an XML version of C#’s object initialisation syntax. For example, when I see <TextBox Name="FirstNumber" Width="120" /> I think of something more like this:
TextBox textBox = new TextBox {Name = "FirstNumber", Width = 120};
Similarly for the StackPanel node shown above, I picture using a list initialisation to populate the control’s Children property (or Content property for most other controls):
StackPanel stackPanel = new StackPanel {
    Children = new List<Control> {
                    new TextBox {Name = "FirstNunber"},
                    new TextBox {Name = "SecondNumber"}
                }};
This won’t actually compile as the Children property is not settable, but the basic idea is the same. Nested elements get added to a property of the parent object (for many controls this is the Content property, but the exact mapping is object-specific).
In the process of building the project, the compiler will create the code required to instantiate each object, initialise its properties (mainly via the XML attributes on the node), and basically build up a nice, big object graph. It also has some additional smarts to handle binding and other expressions, cascading properties etc. I’m not sure if this helps you at all, but this idea really helped demystify XAML for me, even if it is not an exact representation of what actually occurs.
Getting our view to work
How does our app know what {Binding FirstNumber} means? Well, if you try and run the code we have at the moment it’s not going to work. While binding WPF searches the control’s DataContext for the specific (and public!) property. If it can’t find that it will check the parent’s DataContext, and the parent’s parent’s and so on up the object tree. What we want to do is set our view’s DataContext to our view model. We can easily do this in the MainWindow.xaml.cs code behind:
public partial class MainWindow : Window {
    public MainWindow(AdderViewModel viewModel) {
        DataContext = viewModel;
        InitializeComponent();
    }
}
Unfortunately our App.xaml is expecting MainWindow to have a default constructor, so we’ll need to remove the startup attribute and override the application started event to show our view. For a real application this would be a great place for an IoC container call and/or screen activator, but we’ll just new it up for now.
<Application x:Class="WpfCalculatorKata.App"
             xmlns="http://schemas.microsoft.com/winfx/2006/xaml/presentation"
             xmlns:x="http://schemas.microsoft.com/winfx/2006/xaml">
    <Application.Resources>
    </Application.Resources>
</Application>
public partial class App : Application {
    protected override void OnStartup(StartupEventArgs e) {
        var window = new MainWindow(new AdderViewModel(new ConreteAdder()));
        window.Show();
    }
}

public class ConreteAdder : Adder {
    public int Add(int firstNumber, int secondNumber) {
        return firstNumber + secondNumber;
    }
}
You’ll notice that to create our AdderViewModel we need an implementation of our Adder interface. I’ve just chucked in a ConcreteAdder here, completely and utterly uncovered by automated testing (gasp!). It looks close to right from here though, so let’s run it.
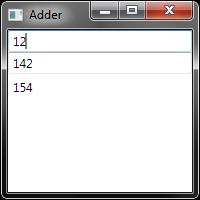
Here we see our UI, happily adding the numbers it’s given. As an aside, if you enter an invalid number while debugging you’ll see data binding errors appear in the output window, but the application will continue running. If you’ve got bindings setup but nothing is happening when you run the app, check the output window and see if there are any messages there.
Updating our view to match our initial mockup
To get a similar UI to our initial mockup, we just need to add some labels to our textboxes and adjust the spacing on our form. We’ll use a Grid instead of our original StackPanel so we can easily align our labels with their textboxes, and we’ll use a style to hard code in the height and vertical alignment of our text boxes. The final XAML and application look like this:
<Window x:Class="WpfCalculatorKata.MainWindow"
        xmlns="http://schemas.microsoft.com/winfx/2006/xaml/presentation"
        xmlns:x="http://schemas.microsoft.com/winfx/2006/xaml"
        Title="Adder" Width="250" Height="200">
    <Window.Resources>
        <Style TargetType="{x:Type TextBox}">
            <Setter Property="Height" Value="23" />
            <Setter Property="VerticalAlignment" Value="Top" />
        </Style>
    </Window.Resources>
    <Grid Margin="15">
        <Grid.RowDefinitions>
            <RowDefinition />
            <RowDefinition />
            <RowDefinition />
        </Grid.RowDefinitions>
        <Grid.ColumnDefinitions>
            <ColumnDefinition Width="100" />
            <ColumnDefinition />
        </Grid.ColumnDefinitions>
        <Label Content="First Number" Grid.Row="0" />
        <Label Content="Second Number" Grid.Row="1" />
        <Label Content="Result" Grid.Row="2" />
        <TextBox Name="firstNumber" Text="{Binding FirstNumber}" Grid.Row="0" Grid.Column="1" />
        <TextBox Name="secondNumber" Text="{Binding SecondNumber}" Grid.Row="1" Grid.Column="1" />
        <Label Name="result" Content="{Binding Result}" Grid.Row="2" Grid.Column="1"/>
    </Grid>
</Window>

Conclusion
We’ve implemented a tremendously useful calculator (well, more correctly, a completely useless small integer adder) using MVVM and WPF. We represented the logical view of our screen using a testable AdderViewModel, which we then bind to from our XAML view. While we used TDD to flesh out how the AdderViewModel was going to interact with our domain model (the Adder), we also needed to know enough about the end goal (to bind to a WPF form) to tell us which tests to write – our tests were not magically going to guide us to a bindable view model. Finally we changed our physical view to better match the layout of our initial mock up, but didn’t have to change any non-XAML code as we did not change the logical model of the view.
Feel free to download the code and have a play. Hope this helps! And remember to correct any n00b mistakes I’ve made. :)